|
Source: Bradders’ guide to Town Hall 10 base building (docs.google.com/document/d/1gFejXelh9XPhvQZ6qBYG67EIIyNiI3VZoX-FhAC3QPc) Special Credits: Bradders; who did excellent research on this subject and allowed us to share it . Note from TheLittleDeath's Blog: The following is excerpts taken from the TH10 Base Building guide, for the full guide you should refer to the above link. This guide was written before the December 2017 update which nerfed the infernos, it doesn't invalidate the entire guide though. However there are a few sections that don't apply post-update; highlighted in red like this text. Please ignore these sections or adapt them as you see fit.  Introduction The purpose of this guide is to give you up and coming base builders a useful tool to aid you in your building of anti-3 town hall 10s. The guides set out in this document are just that, guides, they are not must do’s and every builder should have his or her own creative freedom, it should shine through in your builds. There are some mandatory building and trap placements however. In the realm of the elite, it is common knowledge that the glory is to be had at town hall 10. You can build a base that goes undefeated and that star can be the difference between victory and defeat, it often is. Throughout this guide I will cover the mandatory placements, the optional placements, the creative freedom required, as well as give a brief description of how I go about my builds. It is important to note that there are 2 types of anti 3 town hall 10 base design. Both are similar but there are discrete differences you should be aware of.
Overview Gone are the days of spread out bases. Current meta requires you to build a compact base that has lot’s of defences targeting incoming enemy troops at the same time. This way you’ll eat up incoming attacks and leave the attacker wondering... Where did my troops go? The base should make lalo pathing difficult as well as ground troop pathing without giving up the triple to dragons with easily snipe-able air defences. One of the most common mistakes that even the more experienced builders do is allow a base to be fully connected by 2 jump spells and so it should be incorporated into any build that the double jump doesn’t allow attackers to connect all of the compartments within a base. Mandatory If you haven’t already guessed it, these are the things that are absolutely compulsory in every single build that you do. They are the basics and so in this section a lot of the material is lifted from various th9 guides. Traps These are unknown on the fresh hit, that makes them important!!!! Often in elite competition the first hit is a fresh 10v10 or 11v10 if the th9s haven’t cleared well enough to scout. So the attacker is already making guesses as to where your traps are, don’t help him or her out by making it obvious! Spring Traps As explained in various th9 guides spring traps should be placed within the 1 tile spacing between defensive buildings. There’s no other way to say this, look here’s a picture:  The 2 crosses will work against troop movements, but only in one direction and nobody liked One Direction. Skeleton Traps Have them on ground, the LaLo threat at TH10 isn’t as prevalent as it used to be. And air traps do nothing against dragons. Small Bombs Individual small bombs should be placed 1 tile away from the wall purposely to thwart the wall breaker. In the latest update small bombs were buffed to take out the same level wall breaker as the bomb itself. The 1 tile distance means that the bomb is triggered and explodes before the kamikaze nutcase wall breakers do, job successful. Small bombs right up against the wall do not explode quick enough to stop the wall breaker blowing a hole in that beautiful wall line. Note that wall breakers run between buildings not through them! 2 tiles away from the wall will kill raged wall breakers. 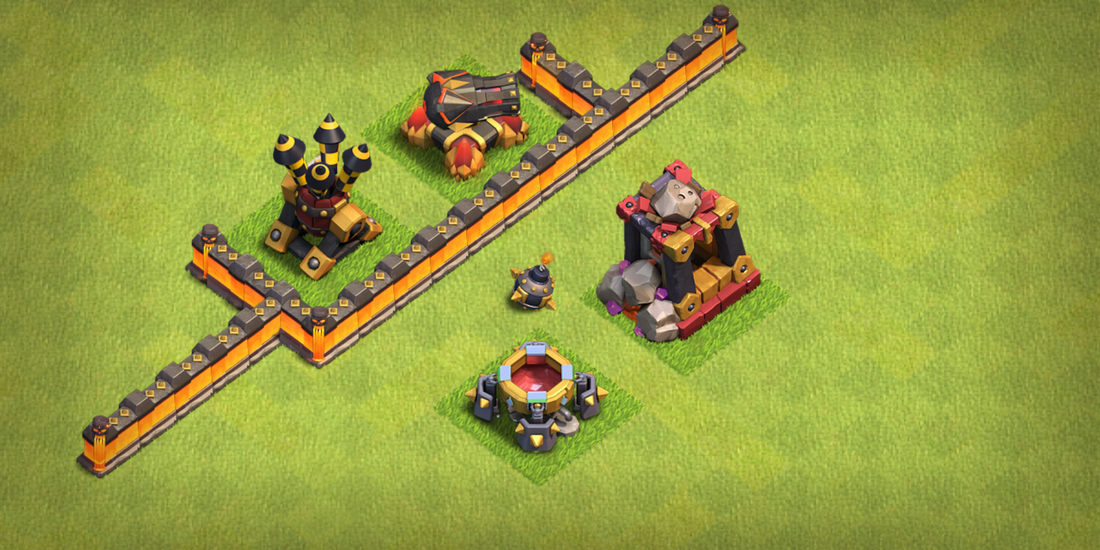 Giant Bombs Doubling up giant bombs used to be the thing to do but the meta has changed. These want to be well spread out, this way hog attackers can’t use 1 heal spell to deal with multiple giant bombs. Spread out giant bombs also mean that an incoming kill squad is more likely to get caught by at least 1 giant bomb (if you’re smart about it you can guarantee this). Some of my bases designed to defend the dip have 4 out of 5 giant bombs outside the exterior of the walls 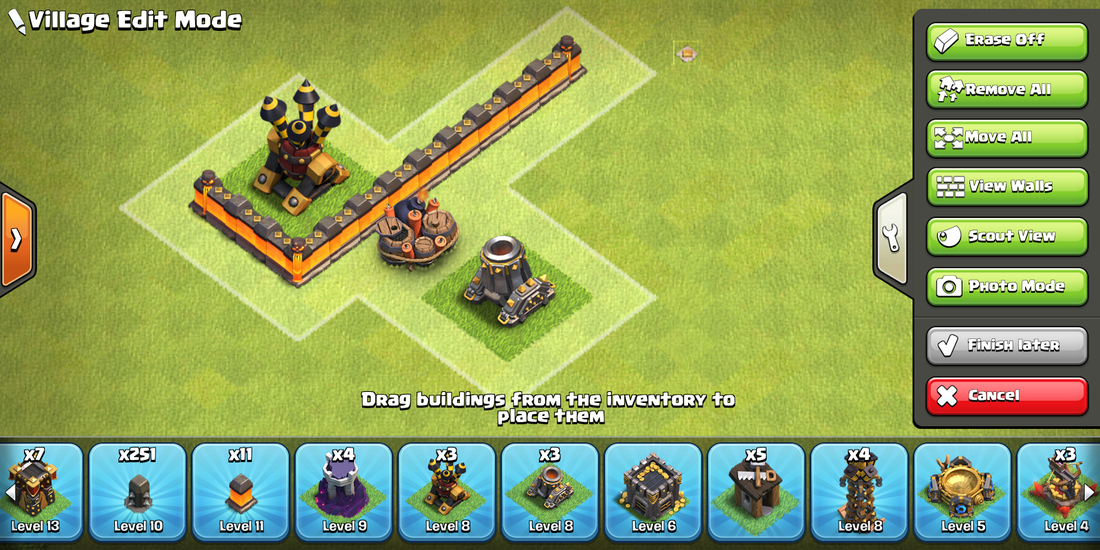 Air bombs Do not place these next to air defences. Their purpose is to take out loons not hounds. So just don’t do it. Seeking Air Mines Do place these near air defences, they’re supposed to take out hounds not loons. So go ahead, do it. If you can place these outside of the wall layer it also helps to prevent queen walks but don’t go mad with it as interior SAM’s break drags, it’s trade off. 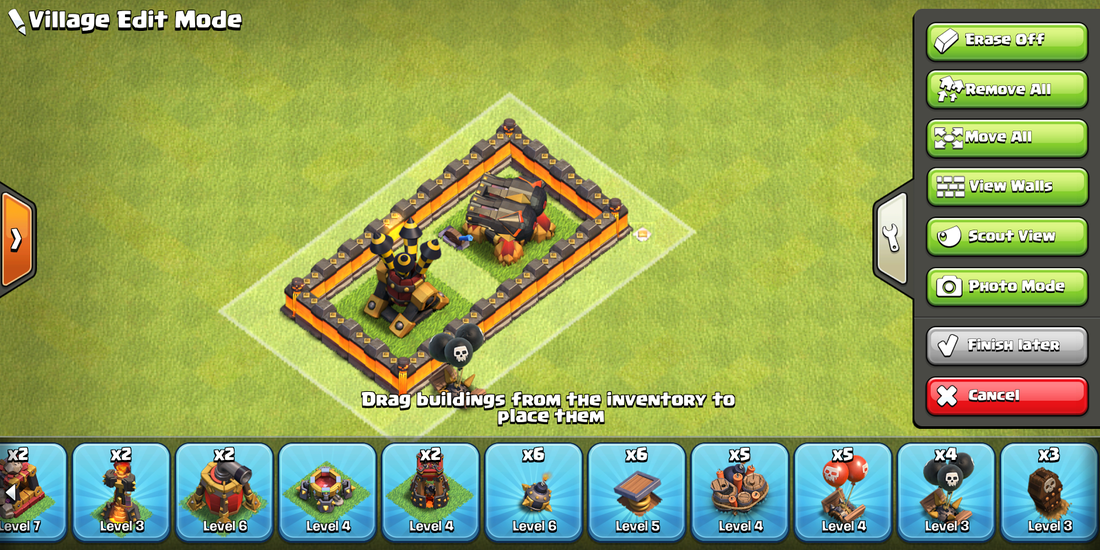 Defences and Heroes Now the buildings that the fresh hitter can see. Clan Castle Placed this here because it does have a range. The clan castle shouldn’t be lurable, make the attacker spend at least 15 troop space if they want to lure the clan castle troops, don’t just give them away. Cannons Place these amongst your air defences so that you get good ground cover to go with your air cover. 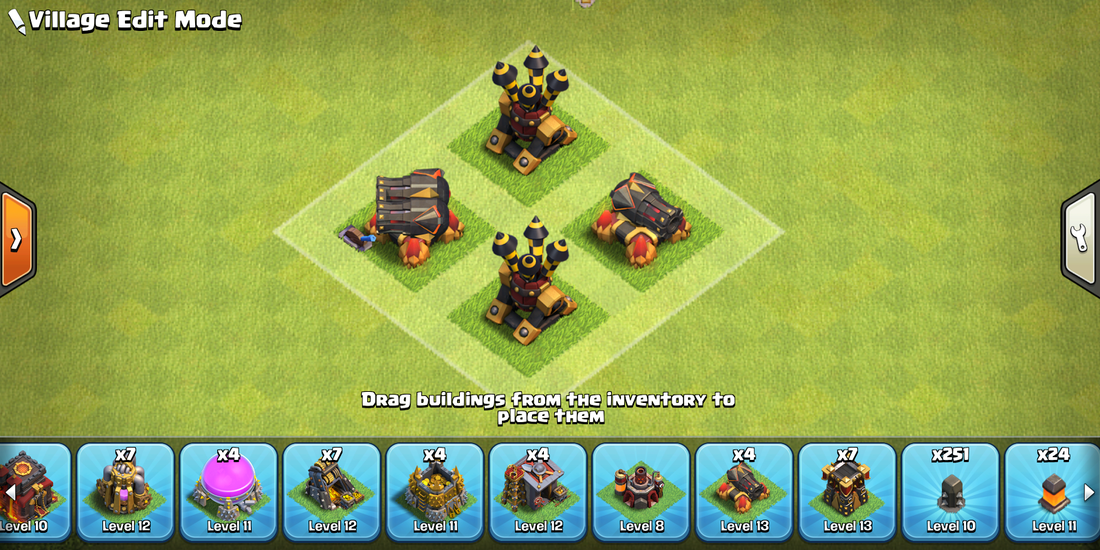 Archer Towers Place these amongst your Wizard Towers so that you maintain good point defence air cover along with your wizardry splash damaging defences. Wizard Towers DO NOT place these so as air defences are within their range, a wizard tower targeting a hound is bad news. 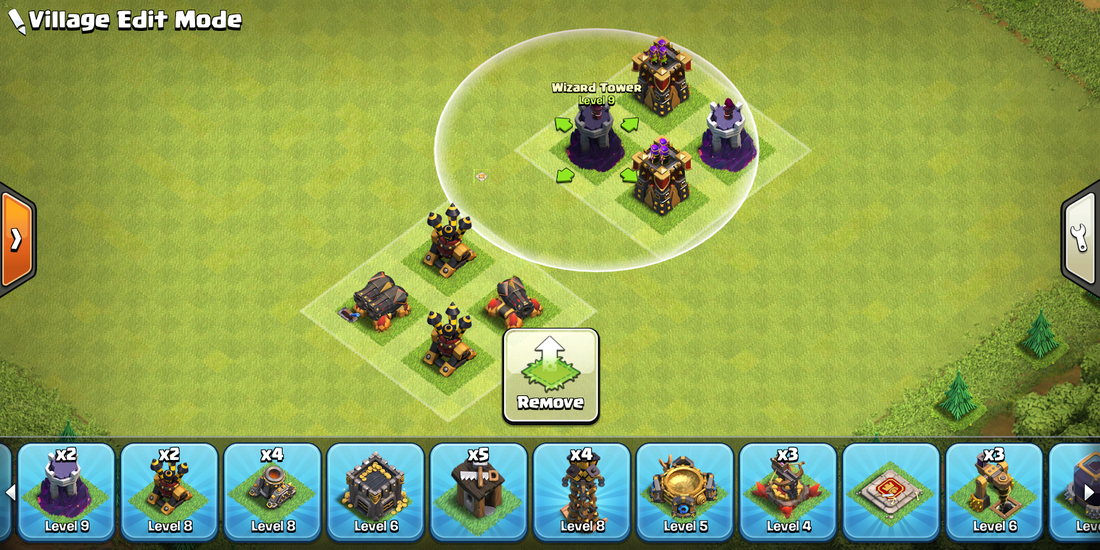 Bomb Towers Do not place these toward the exterior of a base… If a queen can snipe this building from outside the base then you can sure as hell guarantee that the attacker is looking at an easy way to trigger this bomb consequence free. 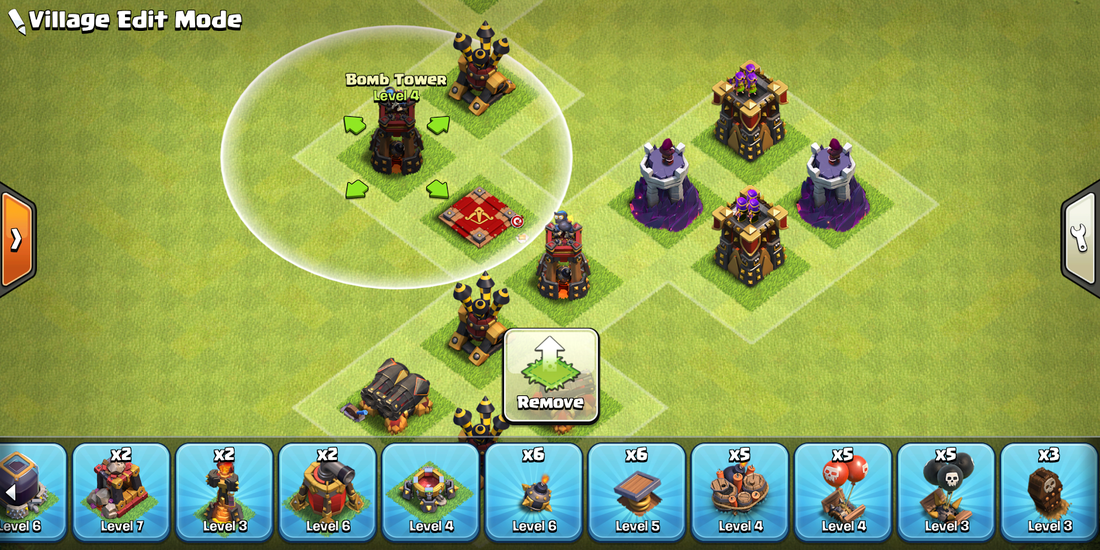 See here how they protect the queen from a raged skelly spell kill. The queen targets the hound and the bomb towers protect the queen while she reks. Mortars Literally the most useless defence in war play, something had to be. Use these to make funneling awkward. Hidden teslas I’ve included these here though I suppose they could have been a trap. They’re important, especially for that fresh hit. Use them to make funneling awkward, or pathing awkward.  X-bows Generally there’s a bit of a mix when it comes to xbows, the only mandatory thing is that you don’t rek yourself by having them set to ground. Air Defences As a group, the mandatory thing to do with Air Defences is not allow all four of them to be walked or sniped, if you do this you open yourself up to a drag hit of some variation. Air Sweepers These must not be paced in such a way that they push healers out of the base… All that does is make the queen walk last longer. Inferno Towers The mandatory thing to do with Inferno Towers is do have them set to multi-target. Their effect on removing healing impact is far superior to having a single targeting high dps structure. Barbarian King Excellent defender against hogs, so don’t allow the attacker to swap him for their king. Archer Queen She’s an absolute beast, protect her. This is mandatory. Not optional. Do not expose her. Do not give her away cheaply. Trash I’m not going to cover every single trash building, the mandatory thing to do here is not have high hit point trash buildings to be used as an anchor point for incoming kill squads. The other mandatory point is to not place trash buildings in such a way that bowler bounces can be achieved on defensive buildings. That means place your trash at least 3 tiles away from the nearest defensive building if it has higher hit points than that defensive building! I realise this cannot always be achieved for trash within the interior but it is a must for the exterior. That means 2 tiles from the wall usually, 2 tiles! This way you can hide tesla locations.  The Town Hall, it’s a 4x4 tile space gold storage. Don’t put it in the core. It can be inside the wall layer if it makes a good deadzone but generally the town hall needs to be on the exterior of the base. The Town Hall is TRASH! Optional This is where some of that creative freedom starts to creep in and where the fun begins… Traps Now this is where the real thought comes in. anybody can throw defences together but if you step back and have an actual thought about the opponent’s likely attack style and execution of said attack, you can break him or her. Skeleton traps Place these within range of splash damage as miners’ AI will target skellies over any other structure so Miners will literally stand their swinging a spade at this tiny little skelly while the Inferno of your choice melts them, wizard towers also like to rek Miners while they swing at skellies. Spring Traps Ok so these bad boys are the best way to thwart hogs, if I’m a hog attacker what are my key objectives before I send in the hogs? The obvious ones don’t matter (queen, cc, an inferno etc.). Wizard Towers, Hogs are weak to wizard towers, so if I can, I will try to pick up wizard towers with my kill squad or queen walk. If it isn’t obvious yet, what I’m saying is, spring traps aren’t necessarily best placed at the feat of wizard towers as skilled hog attackers will try to avoid as many wiz towers as possible. Now there are obviously exceptions but it’s a lot easier to smash your hogs through 4 air defences than it is wiz towers… Do you see where I’m going yet? place them at the feet of air defences! Small Bombs There isn’t much option with these, they either go in a combo to defend witches (explained in th9 guides) or they go 1 tile away from the wall you expect wall breakers to attempt to break.  Giant Bombs Covered in mandatory section as well as th9 guides. I like to have 3 outside the base usually. Maybe more to defend the th11’s maybe less to defend other th10’s. No doubles though. Air bombs These work well next to or near your wizard towers as well as next to or near inferno towers. Don’t stack them though. And again, this is where you need to look at your base design so far and have a real think about where the loons will be bunched up, because that’s where you need these. Seeking Air Mines These are almost the exact opposite of normal air mines. You want them in the paths of hounds and or healers on queen walks. Again, have a look at your base, where would you send your hounds in? If you can place these in the path of queen walks too that works as a buy one get one free, kinda. Defences and heroes
Now the buildings that the fresh hitter can see. Cannons Usually these are all inside the exterior wall layer, they offer very good ground point defence, they can end a queen walk prematurely or at least force spell use. A very underrated defence. They don’t provide air cover so let’s have a think about what these need coupling with… Air Defences! Archer Towers Of the 7 that you have, at least 6 of these are usually placed away from air defences as they are another form of point air defence. They’re a very versatile and are usually accompanied by wizard towers on one side of or in one corner of the base if your wiz towers are diagonally placed. Wizard Towers These can all be placed reasonably close together but not so close together that one heal covers them all as a loon or hog attacker will get incredible value. Again place these away from your air defences and place them in the paths where loons and hogs are likely to bunch up. Bomb Towers So we’ve discovered these should be fairly centrally placed, at least out of reach of a queen walk but where? The easy answer is, these should be placed in such a way that they protect the queen from a skeleton spell kill while she stands shooting at a hound. Bomb Towers don’t target air troops so they are great for wasting those skellies (This is why wizard towers aren’t as prepared for the same job). Mortars Still useless at defending, but they can be used cleverly to cause hogs and loons to leave the interior of the base causing valuable time to be lost. Hidden teslas Say no to tesla farms, say yes to placing these 2 tiles away from a mortar as explained in depth in the th9 guides. Do include the small bomb and giant bomb combo of course! It is also a good idea to use these to again force loons or hogs to leave the interior of the base and waste time hunting a single tesla placed outside the base. X-bows These can be placed centrally or slightly less centrally, don’t allow them to be queen walked though and generally speaking it’s bad form to have 2 in the same compartment; that’s an advertisement for buy one get one free to me. There are exceptions to this of course. Air Defences Make awkward lalo pathing for air defences, if you make a square out of your air defences be prepared to watch the house of cards fall. However having all 4 in a slight curve or line on one side of the base or diagonally through the base means hounds have nowhere to go when the air defences are dealt with causing loons to bunch and die. Having air defences reasonably close also means that the incoming hounds are targeted by more than one air defence, they go double time on that poor houndy. Air Sweepers There’s a little ambiguity with air defences, you want them centrally placed yes. Point them toward your wiz towers to defend the drags while they get taken out by the remaining air defences or point them toward your air defences to slow the incoming loons down while your wiz towers and archers deal with that surviving hound. This is probably the most thought you’ll have to give when it comes to designing a new meta base around your idea. One each way works quite well unless you are certain of the incoming attacks. Inferno Towers Inferno Towers are also a thought provoking structure but are often placed quite early in the build so maybe less so than sweepers. Infernos want to be placed so that a jump does not connect the two compartments that withhold them, unless, they are on adjacent sides of the base. Having infernos on adjacent sides of the base will help with defending miner attacks as it makes pathing more awkward and unpredictable. I personally prefer the infernos to be almost opposite (staggered) but as close together as possible without a jump connecting the compartments. This means that placing a heal spell after the first inferno drops like is often done in the common “bitch” attack is futile as the second inferno eradicates its value. Protect your infernos, they’ll protect you. Don’t allow them to be bowler skipped on from any direction if possible. That kill squad with bowlers in it will take a bounce off your cc and drop the second inferno… at that point the attacker starts rubbing his or her hands together as they anticipate the triple. Barbarian King Can be used to protect your queen or can be away from your queen in the likely path of hogs. You’ll be bored of reading this soon but do please have a think about your design and place your king where he will be needed, protecting your queen or smashing hogs, both work. Archer Queen It’s a safe bet to place your queen centrally, it often works well, protect her and she can end any style of attack that the attacker has in their locker. Trash You should always consider hit points of trash and place accordingly as outlined in the mandatory section. You can use high hit point trash to protect your infernos, this is a common thing to see in new meta base designs at town hall 10 but do remember the 3 tile rule between infernos and other structures, this isn’t mandatory either. Summary There are still a lot of things that are your choice, the main one being the actual shape and design of the base… you just have to encompass everything you’ve read up to this point. Creative Freedom It’s your base, your design, your baby. Use what you know to create a badass base. If you follow this guide you’ll have created a new meta format base that may be able to withhold multiple times in the highest level of competition. High/Low Tiers At Town Hall 10, there are different goals from builds. Generally speaking elite clans will target the lower tier 10s for 10v10 triples and as the defences are simply weaker in some cases the defences are at max th9 level. The higher tier 10s will be targeted by 11s. it’s likely that a lot of these attacks will be fresh hits. It is your job to know about all of the current meta successful attack styles at 10v10 and 11v10 dip. If you know about these styles then it can greatly help when creating that unique bitch of a base. Low tier 10s, for example, might include a centrally placed air defence to help protect against the 10v10 queen walk dragon attack that is becoming quite popular at the top level. Higher tier 10s probably already have enough firepower to stop drags without the need of a centrally placed air defence. Thanks to the Grand Warden you can most of the time expect the kill squad, part of the 11v10 dip, to shred whichever part of the base it enters and expect a deep push so putting giant bombs here when the attacker will likely pop the GW ability is kinda pointless, maybe think about shutting down his back end hogs or loons or stop those witches round the sides. This way the main bulk of the army will have to double back somewhere causing loss in time and often troops. Clan Castle troops Central CC If you think your base is weak to miners only, you may consider having a golem in your CC, this is the quickest way to see off miners but it does little else against other attack styles. Generally centralised cc’s have lalo in them to slow down heavy kill-squads while the queen hits the hound instead of defences. Offset CC Offset cc’s may include 3 valks and a baby dragon in order to wreck a queen walk if that’s what you think is the likely attack on your base. Lurable CC You’re an idiot, why did I bother writing this.
0 Comments
|
Contributed by:Bradders ArchivesCategories |

 RSS Feed
